How to download video classes from BluPrint or Craftsy

Please help us to share this article with your sewing friends by pinning one or more of these images to your Pinterest boards. Thank you.


By now you will most likely have heard that BluPrint has announced they will shortly be closing (exactly when they haven’t said). We were always huge fans of the old Craftsy (although not quite such big fans of BluPrint) so we’re sorry to see it go. You may be worried about what will happen to your ‘Own Forever’ classes. In this step by step, we’ll show you how you can download those Own Forever classes from BluPrint to make sure you can watch them offline in the future, even when the website has closed.
IMPORTANT NOTE – YOU CANNOT do this on a cell phone. They just don’t have enough storage to download dozens of video classes. Best of all would be to use a laptop to download. Even then, depending on how many classes you have to download, and how much spare storage space you have on your laptop, you may want to invest in extra storage. Check out these external hard drives which are the ideal way to save your classes.
CLICK HERE for a selection of external hard drives you can plug in to your USB port for extra storage for all these classes you want to watch again in future.
How to download and save ‘Own Forever’ classes from BluPrint
We’ve tried probably more than half a dozen different ways to download our classes from Bluprint and mostly its been technically challenging, or very tedious to do, selecting each lesson individually and downloading and naming each one. Between us, (we’re Susan and Laura by the way, if you are new here) we have more than 300 classes so we needed something easy.
This is the quickest and easiest way we’ve found, and we’re prepared to pay a little to buy the software to make that happen!
If you find this tutorial useful and you are successful in downloading your classes, will you consider supporting the site and helping towards expenses by buying us a coffee? Click the button below. Thank you.

Preparation – decide which classes to download
There is a feature within BluPrint to ‘archive’ classes you have watched. We can use this feature to decide which classes we want to download. Classes you do NOT want to download should be archived, and the ones you DO want to download must NOT be archived.
Click HERE to access your class library.
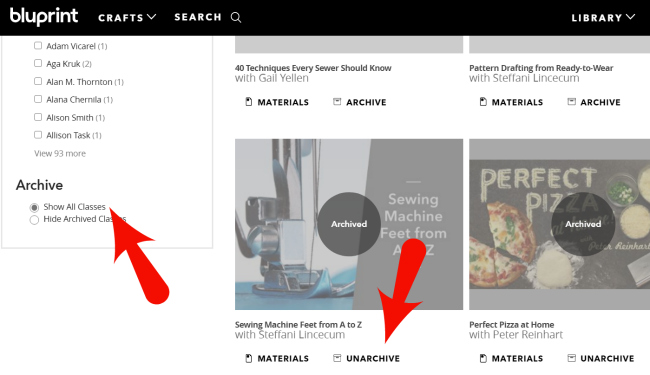
At the bottom of the menu on the left, select SHOW ALL CLASSES. Then scroll through your classes and archive them or unarchive them according to which classes you want to keep. If you change you remind later and want to download a class you have archived, you can unarchive it, and download just that class from the class page. (See how to download a single class at the bottom.)
Step One – Buy the downloading software from Allavsoft.
OK, don’t panic. It’s not too expensive. You can buy the software for $19.99 (plus taxes if that applies to you) and trust us, compared to spending weeks at the computer, it’s better to spend a few dollars to make this all happen magically in the background, with just a few clicks.
Click the image below to go to the Allavsoft website.
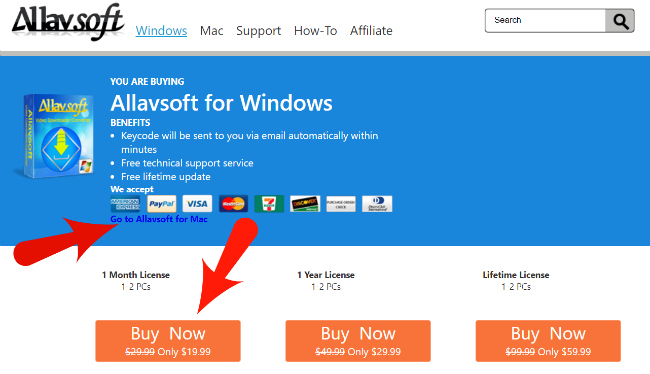
There are different versions of the software depending if you are on a Windows PC or on a Mac. make sure to pick the correct option for you – see the option right under the little payment icons to change from Windows to Mac.
You can see three different options in the orange buttons. Buy for 1 month, buy for 1 year or buy the lifetime licence. Click on where it says the option on the left – buy a 1 month licence. That should be enough time to get all of your classes downloaded.
The One-year or Lifetime Licence is good value so if you think you might want to use this software again in future, then you can invest in the upgraded licence and it will work now for BluPrint and other videos and platforms in future if you need it.
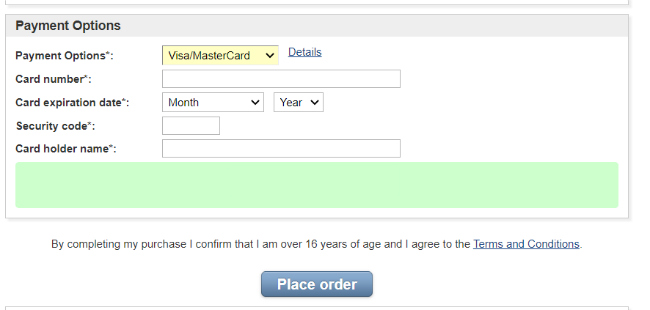
Your product is added to the cart and if applicable, taxes are applied to your purchase.
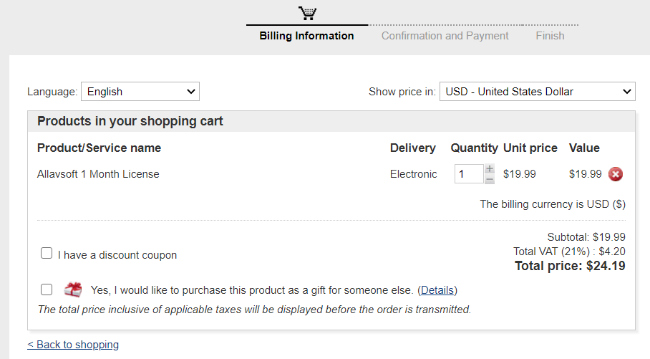
Now scroll down and enter your personal information and email address. At the bottom, you can choose how you want to pay, including bank cards or even PayPal. Fill everything, out, double check your email address is correct and then Place Order.
Step two – install the software
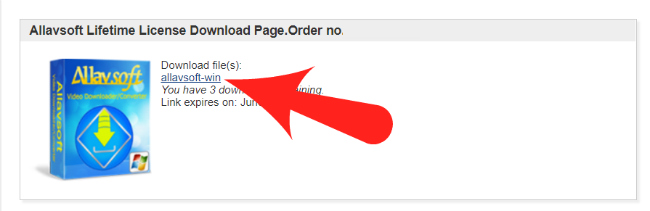
Take a look in your inbox for the email receipt. If it’s not there, remember to check your spam or junk folder just in case. Your email has your licence key to activate the software, and a download button to download the install files.
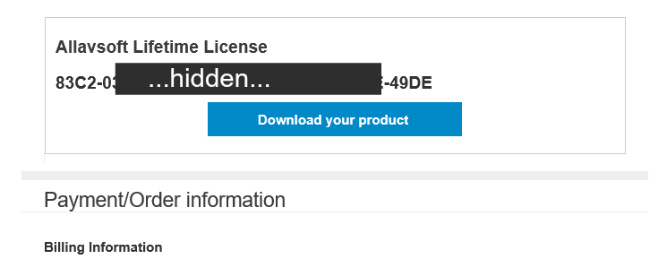
Click where it says “Download your product” to download the software and then install it on your computer. Accept the licence and all of the default settings during installation.
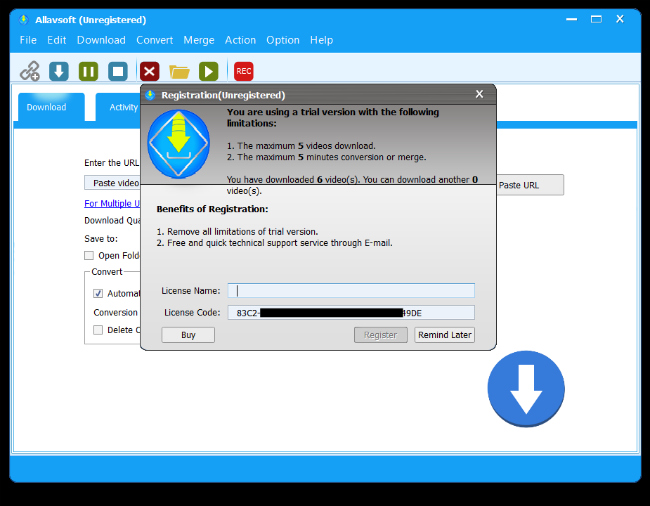
When the product is installed, you’ll be asked to register. Copy and paste your licence key from the email receipt, enter your name and hit Register. Now your software is ready to use.
Step three – Allavsoft settings
We are going to make just a few simple changes to the settings so that your classes will download easily and automatically. At the top of the software, in the menu, look for where it says Option. Under Option you’ll find Preferences – that’s where we will find the settings to change.
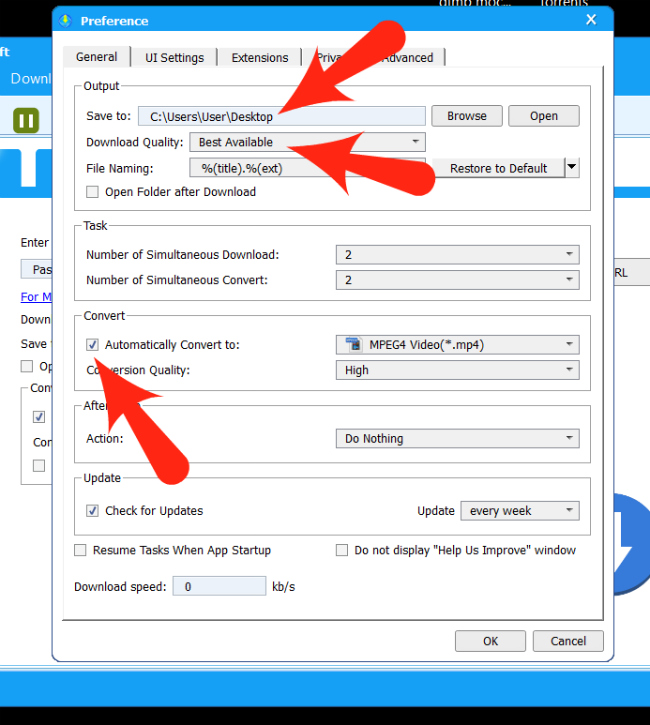
On the General Tab, Save To should be the folder or directory where you want to save your videos. Change this so you can easily find them later.
IMPORTANT – some users have reported that their downloads won’t start and show zero progress if they select an external drive here. For best results pick (or create) a folder on your computer hard drive for the downloads, and then move them across to the external hard drive when they are completed.
Download quality – pick the quality of your downloads. Picking the best available quality will take longer to download and will take up more space on your hard drive, but will give a clearer picture.
[UPDATE – it is no longer necessary to check the Automatically convert box. Files are downloading as MP4 along with the associated subtitles files. Converting has caused issues for some Mac users and is not necessary.]
Leave all the other settings on this page unchanged.
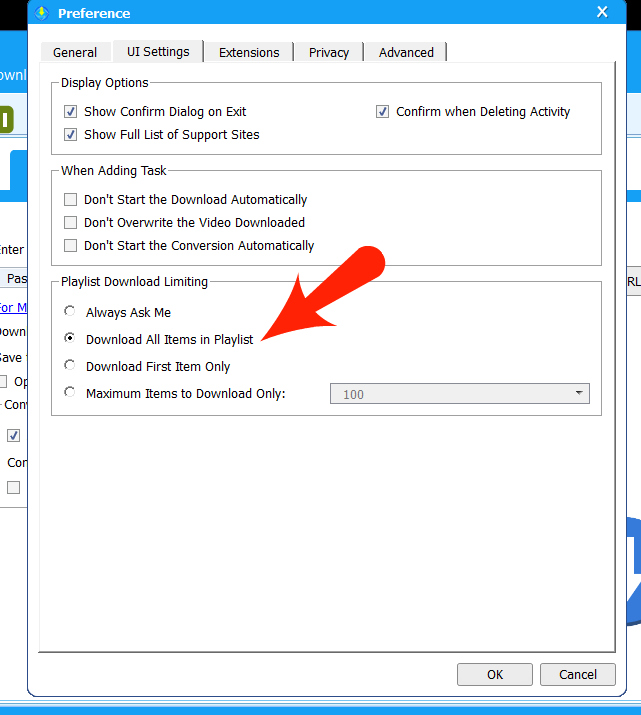
IMPORTANT – On the UI Settings tab, make sure to select “Download ALL Items in Playlist” so that you get all the lessons in the class, not just the first one! When you have changed all of your settings, hit the OK to save them.
Step four – prepare to download all of your BluPrint classes
Now we are ready to download the classes. From here’s it’s easy (although it’s going to take some time if you have a lot of classes and a slow internet connection!)
You will need to copy and paste the URL that links to your class library. Copy from below and paste into Allavsoft where shown in the picture.
https://shop.mybluprint.com/account/class-library
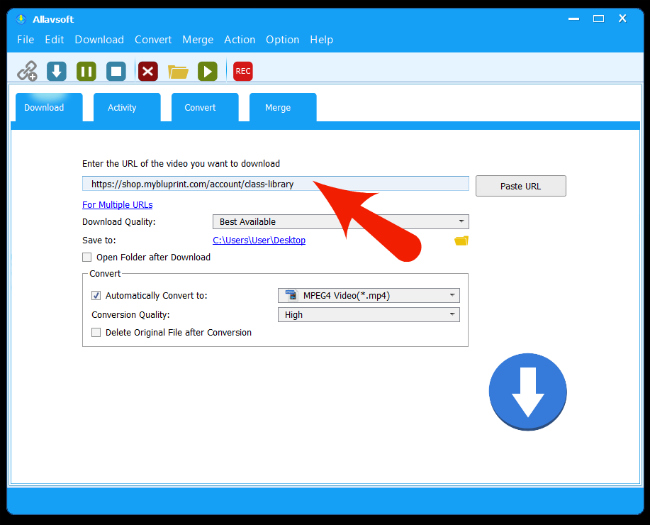
Just look over the settings on that page to make sure you are happy with where the videos are going to be saved, the quality of your download and that you have the box checked to convert to MP4.
When you are happy with the settings, hit the download button – the arrow in the circle bottom right.
Step five – provide your login details for BluPrint
The classes aren’t publicly available, they are secured behind your personal BluPrint login, so you need to give that login to the software so it can read and download your classes. Make sure to correctly copy over your BluPrint email address and password.
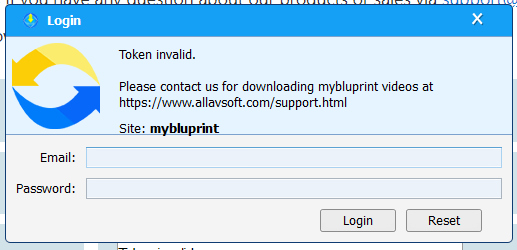
At this point you MAY run into an issue. We got a Token Invalid error when trying to enter our password. That may happen to you too. If it does, their customer service will soon fix it for you.
Go back to your Allavsoft email receipt and forward it to this email address:
Let them know that you are trying to download from BluPrint, that you have a Token Invalid error. Send them your BluPrint login email and password and they will manually enter it into your software so you’ll be able to connect and download. This will associate your login with your version of the software. It’s just a little glitch.
Step six – sit back and wait while all of your classes download
Now comes the hardest part – sit back and wait. Seriously, touch nothing. Do nothing, don’t fiddle with any of the settings etc now. You just have to be patient and let the software do its thing.
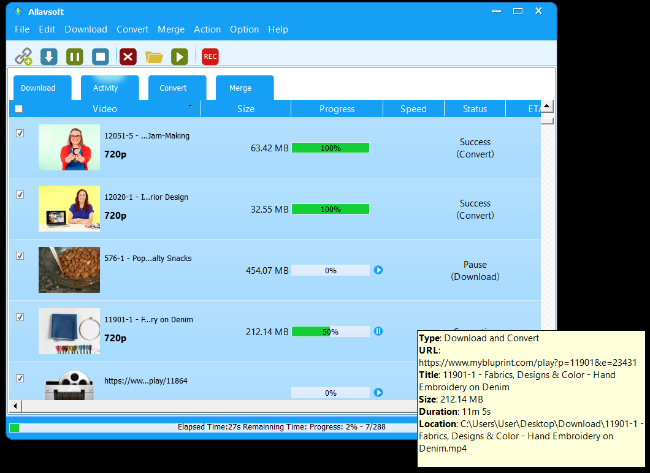
You’ll be able to hover your mouse over the videos and see the details of them downloading but just leave them to it. As the software starts each class, it will see that there are multiple lessons and will queue all of the lessons as individual files.
Don’t turn off or shut down your computer, make sure it’s on mains power and leave it. Overnight? A couple of days even. It depends on how many classes you have. Be patient and don’t mess it up now!
When the bar next to each lesson is green and showing 100%, it’s finished.
Step seven – organize your files
Now you have all of your classes, it’s time to organize them however way seems best to you. Let’s look at the ‘anatomy’ of the downloaded files to see what it all means.
This might be a typical file name for one of your downloads:
12011-01 – Introduction – How to Sell at Craft Fairs.mp4
- 12011 is the class number given to the class by Craftsy/BluPrint. This will help you to sort your files into order so all lessons for a single class are sorted next to each other
- -01 is the lesson number within the class. So in this case, this is lesson one.
- Introduction – the name of that lesson
- How to Sell at Craft Fairs – the name of the class
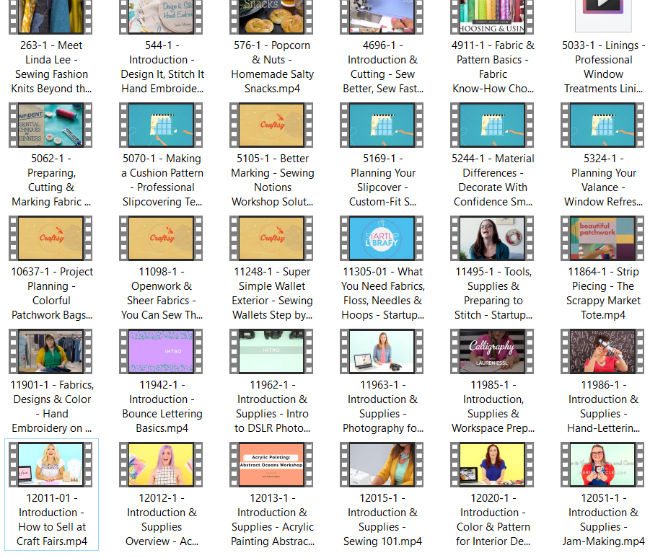
So you may wish to make a folder on your hard drive called How to Sell At Craft Fairs and then drag all of the classes with number 12011 into the folder. They’ll all be saved in order, lessons 01, 02, 03 etc
You may then wish to create folders based on class type, such as sewing, quilting, baking, photography, knitting etc and drag the individual class folders into here to make your classes easier to find at a later date. Sort them out how it seems logical to you.
DON’T FORGET – to download class materials such as patterns and recipes now before BluPrint closes. Click HERE to access your class library. Each class has a link to click through and download the class materials.
The final step – watch all your classes!
Now you can sit back and watch all of those classes at your leisure. If you haven’t done so yet, consider getting one of those external hard drives, just in case your laptop fails and you lose all the classes again. Always better to have two copies of important files, just in case.
How to download a single class with one click
If you have some classes still archived and want to change your mind and download one, here’s how to do it. Go into your class library, Show All Classes and then unarchive the class you want to download. (See above how to archive and unarchive classes).
Then click into the class you want to download and copy the URL of the page.
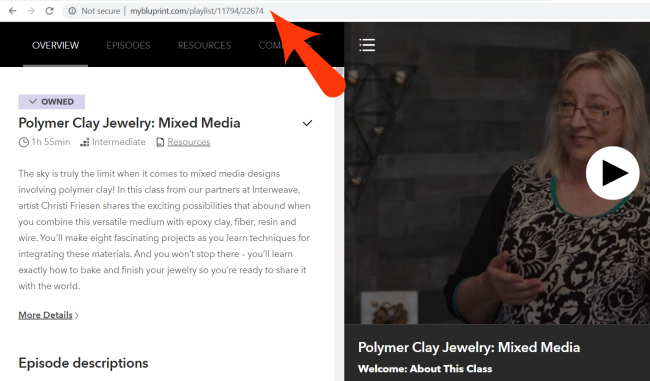
In this example /playlist/11794/22674 the number 11794 is the class number and the 22674 is the lesson, in this case, lesson one. To make it easy we want to download the whole class at once so you copy and paste the URL for the page and then TAKE OFF the last set of numbers for the lesson.
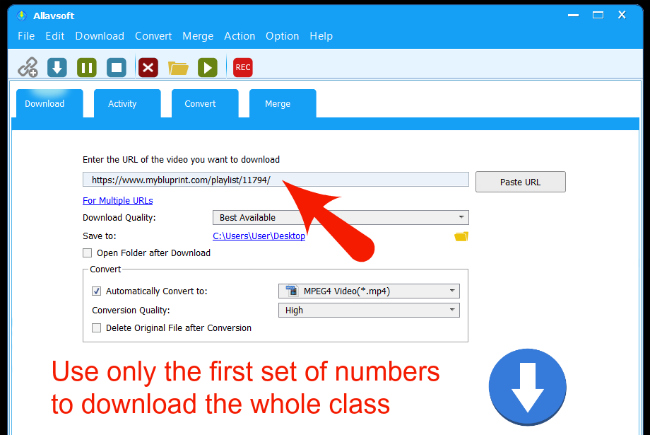
You’ll be left with http://mybluprint.com/playlist/11794
Paste the URL into Allavsoft, take off the second set of numbers, and hit the download button to download the whole class. Easy as that.
Troubleshooting – zero download progress
Luckily things usually run smoothly, but some users have reported that their downloads don’t start and show zero progress. If this happens to you, check these settings:
- You may have selected your external hard drive as the Save To location. Change to a location on your laptop hard drive and move completed downloads to the external drive as they complete.
- Check you have sufficient space left on your computer to download. Empty your recycle bin, remove old files or move completed downloads to an external drive to free up more space.
- You should have the “Download ALL Items in Playlist” option checked in the UI settings tab. Otherwise, there may be a pop up which asks you do you want to download the first or all files. The pop up might end up hidden behind another window so your downloads sit there endlessly waiting for you to check a box you cannot see.
- Did you change the File Naming in the preferences? There may be a mis-type. Hit the button to ‘Restore to default’.
- Are you sharing your internet connection with another device in the house such as a TV. It’s possible the TV is interrupting the download.
- MAC users. A tip from Angela. “On a Mac you need to go to the security settings in the general “settings” area (not Allavsoft) and you go the privacy tab. Then you need to give permission to allow the Allavsoft program to write to disc. Once this was reset as above the program ran correctly and I can save to my hard disc.”
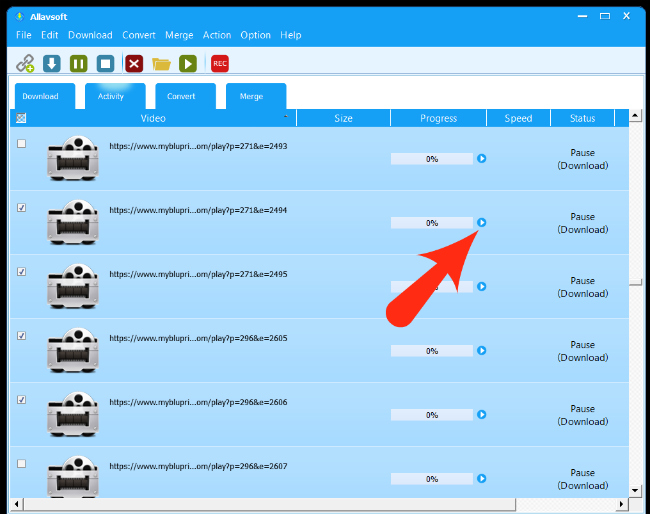
- Did your computer go to sleep or power down, or did you lose your internet connection? This can cause your downloads to fail or pause. Hit the little play button next to the file to restart.
You may need to close the software and restart it for any changes to take effect and for the files to restart.
To start again from scratch, go to Edit -> Clear All to remove everything from your activity list and then restart from the beginning with the link to your class library.
What about the patterns I’ve bought on BluPrint?
We should also say, that in the past we’ve linked to and recommended a number of free bag patterns that were found on the old Craftsy platform. Now BluPrint is closing, these are no longer available. It’s a big job, but we’re going through all the old articles to track down those links and try to find alternative places you can find and download those patterns. Please bear with us while we work through the problem, and sorry in the meantime if you come across any links to Craftsy patterns that are no longer available.
If you have any free or paid patterns in your library you should make sure to download them now.


